How to create a
disjointed rollover button in Fireworks 2.0
Product:
Fireworks
Platform:
All
Versions:
2.0 and above
ID:
13899
Rollover buttons
Adding a rollover button to a Web page adds interactivity and clues
to help the user navigate throughout the site's pages. The simple rollover
button would allow the functionality of an image starting with an original
state (for example: a red circle) and when the user rolls the mouse over
the button it swaps for an alternate image state (a blue circle). The
original image source is "swapped" for a different image source, replacing
the original in the same location. Because the image graphically changes,
the button can be an indication to the user that if they click on the
button, they may trigger another event, perhaps the button links to a new
page or a sound will play. The rollover button graphically gives the user
feedback to continue interactivity.
Simple rollover
example In the following example when the mouse rolls over the red button
it changes from red to blue. The red button image is swapped for the blue
button.
For
information on how to create a simple rollover in Fireworks 1.0, select
Help Index from the Help pop-up menu. The Index dialog box appears. Type
the words rollovers, JavaScript in field number one. With the word
JavaScript selected in field number two, click on the display button to
access the step by step instructions.
To create a
simple rollover in Fireworks 2.0, select Creating Rollovers from the Help
pop-up menu.
Disjointed rollover
buttons A "disjointed" rollover works differently. When a user rolls over a
button (the red circle) another element somewhere on the page changes. For
instance, the red circle could remain the same, but to the right of the
red circle, another graphic could appear. This new graphic might be text
that would indicate what would happen if the button were clicked, or it
might be simply for generating dynamic content. In another design
approach, the red circle itself could also swap to an alternate image at
the same time as the disjointed file graphically changes.
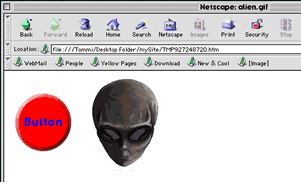
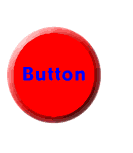
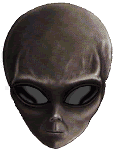
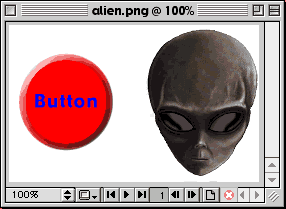
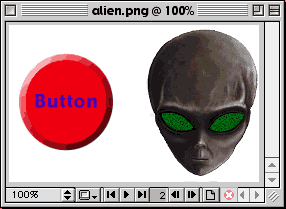
Disjointed rollover
example In the following example when the mouse rolls over the red button
the eyes in the alien graphic change to green. The rollover action on the
red button prompted an event with the other image.
To create a
disjointed rollover in Fireworks 2.0, follow the steps
below:
1
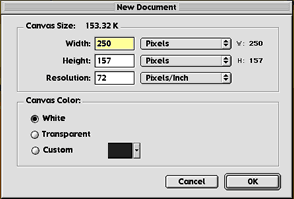
Launch Fireworks
and choose File > New. Select the size of the canvas and the
canvas color, then click OK. (These selections can be modified
later, if necessary, by choosing Modify > Document > Canvas
Size or Canvas Color).
2
Using
the drawing construction tools in the toolbar, create the original
state of the button. The original state refers to how the button
will look when the page first loads, prior to a mouse rolling over
it.
At this
point, a design decision should be made to determine whether the
disjointed rollover will affect a portion of the original image or a
separate image file entirely.
If you
choose to incorporate the disjointed image into the original image
being created, keep in mind that each portion of the image (the area
the mouse rolls over and the area that changes when the mouse rolls
over) must be in separate slices.
Note:Hotspots can
receive mouse events but cannot perform a related rollover or swap
image action. Only slices can receive JavaScript actions and perform
them.
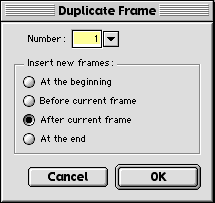
3
When the
original state of the graphic is completed, open the Frames Palette
by choosing Frames from the Window pop-up menu. Click on the arrow
in the upper right hand corner to access the frames pop-up menu, and
select Duplicate Frame from the list. A dialog box appears with a
pop-up menu that allows selection of the number of frames you would
like to duplicate.
To
create a disjointed rollover like the example above, select 1. Use
the default choice of After Current Frame and click OK.
Note:To create a more
complex button with a down state and an over down state choose 3
from the number pop-up menu.
4
Back in
the Frames Palette, the newly created frame(s) now appear. Click on
Frame 2 to select it, and use the tools to graphically change it's
appearance. The image as it appears in frame number 2 will display
when the mouse rolls over an area.
If you
wish to have the button itself graphically change when it is rolled
over, or if you wish to incorporate the disjointed rollover into the
same graphic, make sure to change it graphically in Frame
2.
If you
do not wish to have the button itself graphically change when rolled
over, and the disjointed image that will swap is in another file,
steps three and four can be skipped.
If you
wish the button to have all four states, select frames 2 through 4
one at a time in the frames palette, and make changes to the graphic
of each frame. Frame 2 will be the state of the button when the
mouse rolls over it, Frame 3 will be the state of the button when
the button has been clicked on and Frame 4 will be the state of the
button while the mouse is currently over the clicked button.
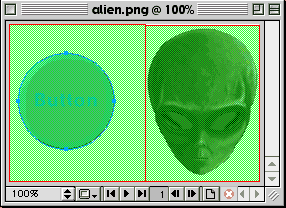
5
Select
the slice tool from the bottom of the toolbar. Draw slices to
separate the regions of the area into different images that will
ultimately appear in separate table cells.
Note: If the
disjointed image is integrated into this graphic, make sure that the
area that swaps when the mouse rolls over is in a separate slice
from the area where the mouse will rollover the graphic to cause the
event.
If the
shape of the button that the mouse will rollover is not geometric,
the hotspot tool can be used instead to encircle an organic shape.
Click on the hotspot or slice that you wish to be the "event
receiver".
In this
above example, the slice encircling the round button is the area
that will receive the mouse events and cause a graphic change
elsewhere.
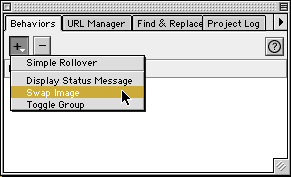
6
Next
select Window > Behaviors. In the Behavior Inspector, click on
the + button and choose Swap Image from the pop-up menu.
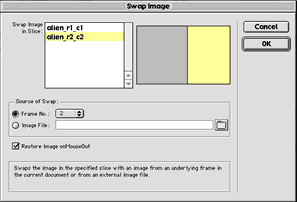
7
The Swap
Image dialog box allows you to select the image that will
graphically change when the mouse is over the slice selected in step
5.
If the
disjointed image is part of the existing graphic, choose the slice
from the list in the box "Swap Image in Slice" or click on the slice
area to be swapped in the slice preview to the right of the list.
Then click on the radio button next to Frame No., and choose the
frame that you wish to display from the pop-up menu.
If the
swap image rollover will graphically change an image outside of the
current graphic, click on the radio button next to Image File. Then,
click on the file folder icon to the right of the field and browse
to select the image file.
Keep the
box next to Restore Image onMouseOut selected, so that the rollover
will revert back to the original state when the user's mouse rolls
off the event receiver.
Click OK
to close this dialog box.
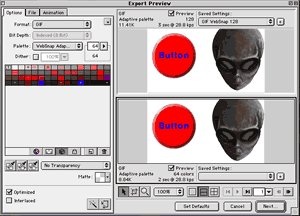
8
From the
File pop-up menu, select Export. This brings up the Export Preview
dialog box. Choose either a GIF or JPEG format and select the
appropriate optimization for a good balance between image quality
and file size.
Click
the Next button to continue.
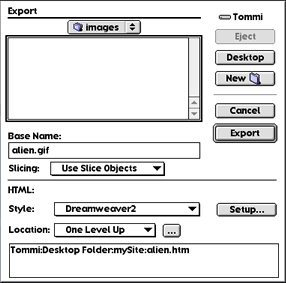
9
In the
Export dialog navigate to choose a location inside the local root
folder to save the files. Type in a file name in the field next to
Base Name.
From the
Slicing pop-up menu, choose Use Slice Objects. The HTML Style pop-up
menu allows you to choose the type of code that will work best with
your HTML text editor.
If you
are using Dreamweaver to create your Web site, choose Dreamweaver 2
from the list. If the application you are using is not listed,
choose Generic.
The
Location pop-up menu allows you to select where the HTML file that
Fireworks generates will be located.
If you
are planning on copying the resulting code from the HTML source file
that Fireworks creates into an existing HTML page in your site, make
sure to choose the folder where the existing HTML page currently
lives. This will ensure that the paths that are created in the
source code will not be broken when you copy the source into the
existing file.
Click on
the Save button to export the sliced images and HTML page with table
and JavaScript information.
10
To
review your work, open up the HTML file that Fireworks created in a
browser. Roll your mouse over the "event receiver" to see the
disjointed rollover in action.
If the
rollover needs to incorporated into an existing HTML page, open the
file in an HTML text editor, view the page source and follow the
instructions for copying the JavaScript into the <head> of the
existing file, then copy the table into the <body> of the
existing file.
Since
the HTML document that Fireworks exported was saved into the same
folder as the existing HTML page, the paths will be correct.
Additional
information Other special effects
can be achieved by applying multiple swap image behaviors to the event
receiver, each swapping with a different external file. To create a swap
image that places the rollover state of the image partially on top of the
original state, use the Show/Hide layers behavior in
Dreamweaver.
Using a
combination of behaviors and events, it is possible to create any number
of interactive graphic rollovers. The timeline in Dreamweaver can also be
utilized to merge a combination of behaviors that are triggered by the
user's mouse events.
To learn more about
working with Dreamweaver behaviors to create disjointed animations, see
the Dreamweaver article, Top five behaviors to use in your site.
Last updated:
January
22, 2003
Keywords:
disjoint rollover button, swap image, JavaScript behaviors,
navigation bar